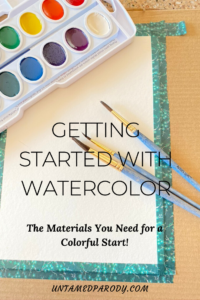
There’s something relaxing and almost hypnotic about watercolor. Just a drop of paint on water-prepared paper swirls and turns into something beautiful. Here’s my complete list of materials needed for Getting Started with Watercolor. Join me, and let’s learn to create beautiful art together!
I don’t know what possessed me to start my art journey with watercolor. I’m guessing it was my usual “go big or go home”. But, watercolor calls to me, with its flowing colors, and gentle lines. I’ve always loved watercolors, even as a child. What I didn’t realize (or remember) was that watercolor is not an easy medium. Not as forgiving as oil or acrylic, certainly. I didn’t find it a medium to just hit the paper running!
The Lost Art
As I was getting set up, I was trying to remember the last time I seriously watercolor painted. Sure, I used to watercolor at home in my favorite coloring books. But the best I can guess is maybe eighth grade might was the last of it. I attended a Catholic school through 8th grade, before switching to a public school. I do know we had all the subjects every year, all year, including art. But I don’t recall having actual art teachers (it was a small school!).
I don’t remember being required to have art classes once I hit public school in 9th grade; I think they were electives. My wheelhouse was always English, Literature, Writing or Foreign Language class over any other type of class, if given a choice. And frankly, once I hit high school and saw so many talented kids, I knew I’d feel nothing but frustration trying to keep up. So I never took an art class again.
Finding Art Again
The last several years, I’ve had this yearning to learn how to do something artsy. While I can crochet like the wind, and have even made complicated doilies, I’ve never been one to paint or draw. I find such pleasure in going to art galleries or showings, studying other people’s work, and exploring how I feel about what I see. My biggest thrill was spending the better part of a day at The Getty Museum a few years back! But put a pencil or paintbrush in my hand, and I’m stopped in my tracks.
I made a commitment to myself to break the drought and try to learn how to sketch, draw, and paint…and find joy in it. In finding art again, I hope to find courage, patience and acceptance, too. While my art may never hang in a gallery, I hope to stretch creative myself in ways I’ve not stretched before. And maybe…just maybe…I can create something that I’ll love so much I want to actually display it in our home. A girl can hope…right?! O.k…enough with the squishy stuff. Let’s get started!
My Favorite Tutorial Videos
First up, I headed to YouTube to find some good tutorials. YouTube is like Walmart – if it’s not there, you don’t need it! Am I right?! I found some terrific step-by-step videos that not only told me the right materials to use and why, but had what I thought would be pretty simple projects I could work on right along with them.
This video by Kelogsloops was terrific because it first shows how to do some random patterning. It then bridges into what I think is a really fun painting of a girl. I just love watching how his painting unfolds, and actually think I can do that…with some practice first!
The second beginner video I watched is by Paul Priestley. I like how he explains what brushes are key, and what they’re used for. But one little sentence he added was how to tell if you have a good brush or a bad brush…bad brushes droop when wet. I also like how he shows you what happens with your color when you have too much or too little water on the paper or how to adjust paint on the brush as a way to switch up technique.

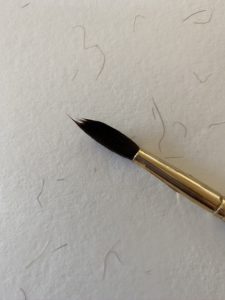
My cheap (bad) paintbrush left hairs all over my paper. Yuck! I needed a new paintbrush…
The video I actually followed with my first try at watercolor is this one by YouTuber, Makoccino. I love her pace, and watched her a couple times before I dipped my brush. Her list of needed materials is small, and she explains the WHY behind the WHAT. She also talked about bad paintbrushes dropping hair, which I experienced when I was doing my wet wash on my paper. So terribly frustrating as I couldn’t just pick them off. They seemed to soak right into the paper! Lesson #1 – the set of brushes I thought were such a great deal were no deal at all. I followed Priestly’s and Makoccino’s advice and ran to my local hobby shop and bought some GOOD brushes. And, you can bet I tested them first to see if I could pull hairs out!
Materials Hold the Key
In all cases, the tutorials stressed the fact that you don’t need a ton of expensive materials to get started with watercolor painting. Thank God! I kept envisioning a list as long as my arm, and then what if I hate it? But, there are a couple of materials that really hold the key – good quality brushes, watercolor paper, and paints.
Brushes
In researching brushes, I learned that there are a number of “natural” bristle brushes on the market – sable, squirrel, camel, horsehair and goat to name a few. There are also synthetic, nylon brushes. There are also brushes that are a combination of natural and synthetic bristles. A couple of key things to keep in mind:
- Get the best your budget will afford.
- Make sure the brushes don’t lose their bristles easily. Give the tip of the brush a little tug before you buy it. If the bristles come out, look for a different brush. (see my hairy paper picture above!)
- If you’re just starting to watercolor, you don’t need a lot of brushes. Buy just two good ones, both of them round but in different sizes. Aim for a size 10 which, according to what I’m learning, will be the most versatile, and maybe a 4 or 6 so you have a finer point. Note that the lower the number, the smaller the brush head.
- Some others you might add, if your budget allows – flat, fan, filbert and mop.
Paper
It must be watercolor paper because it’s specifically made for handling the water you’ll be using. Remember, all paper is made largely from water so it doesn’t take much for standard or non-watercolor paper to not only wrinkle terribly, but begin to break down. My research says 140# watercolor paper is best. It’s thick, stiff and sturdy, and will hold up well to water.
You’ll find both glued pads and spiral notebook-type pads. I recommend the glued pad so you can easily and cleanly tear out one page at a time to work with. Typically, pads come in two sizes – 9″ x 12″ or 6″ x 9″. Start with the smaller size, so you can better control the page and the paint. Be sure to shop the pad prices. You might find it’s less expensive and you’ll get more pieces if you buy the larger pad and cut the sheets in half. I lucked out on a BOGO sale, and bought a 9″ x 12″ glued pad along with a 6″ x 9″ glued pad. Don’t forget to watch for coupons from your local craft store!
Paints
This is where the options abound. You can buy trays containing anywhere from eight to 24 or more colors, and from $5.99 to well over $100! What I didn’t realize is that watercolors also come in individual color tubes. Yeah, I’ll just pass right by those for now. I’m guessing you kinda need to know what you’re doing with color to use those…anywhooo…
If you’re just starting like me, I recommend getting a smaller, inexpensive set to try out. I chose a tray that has 16 colors that I can use on their own, or attempt some blending. In my initial trial of the paints, I seem to be able to get both intense and light colors, depending on how much water I’m using. So, I think I chose well. This is what I have:
The Rest of the List
What else do you need? The rest are simple things that you probably have laying around the house:
- 2 glasses or jars of water – one is clean water for washing your paper for a wet-on-wet technique (coming in my next segment), the other is to rinse your brushes. I used small, clear mason jars so I could be sure to not cross-mix the waters!
- a couple sheets of paper towel – 1 to blot your wet brush, the other to clean up messes or to blot your painting
- masking tape or washi tape – to hold your paper down – just make sure you can peel it off and not tear your paper
- piece of stiff cardboard that’s several inches larger than your paper
So, there you have it. All the materials you need for Getting Started with Watercolor. All told, I think I spent about $25 on this artsy endeavor. Enough to get some good brushes, paper and paint, but not so much that I’ll kick myself all the way to the bank for wasting money on something I don’t enjoy.
Now, if you’re with me on this journey, head to your local craft store or over to Amazon and pick up your supplies. Next up, we’re Dipping the Brush – Working with Watercolor. See you there!
