
When the weather turns chilly, my thoughts turn to curling up with a cozy blanket. It’s fun for everyone, and an especially great activity to do with those with dementia! Let’s make my Fast and Easy Tie Blanket.
A few years ago, we were looking for a fun fundraising event for the Alzheimer’s Association Longest Day (summer solstice, the longest day of the year). It’s a day of remembrance and support for those on the journey of dementia and those who’ve lost the fight. “Together, the strength of our light will outshine the darkness of Alzheimer’s.” (attribution: Alzheimer’s Association)
I was the executive director at a senior living community where we cared for people with various forms of dementia. We always held a full week’s worth of events leading up to the Longest Day, and incorporated some type of fundraiser. One of my team members came up with the idea of making and selling tie blankets.
It turned into a terrific and fun activity with residents of all capabilities. We bought a variety of fleece fabric patterns and solids and cut it into lap-sized blankets. Then, we rounded up residents to help us cut and tie them. We had so much fun, not only making the blankets, but more importantly making and sharing memories together.
Tie blankets are so easy, they’re a terrific activity to do with children on a rainy day, and a perfect activity to do with those with memory challenges. Tying knots is a simple learning activity with children, and seems to be a task that those with dementia don’t lose. In both cases, it’s not too challenging that they will lose interest quickly.
If you’re looking for another great option for this type of blanket, consider checking with your local animal shelters and rescues. These blankets are perfect for dogs, cats, and other creatures needing comfort and warmth!
Supplies Needed
- 2 pieces of fleece, according to desired size (keep reading for sizing)
- Straight sewing pins
- Sharp fabric scissors
- Ruler or yardstick (if you don’t have either, simply use masking tape to mark your line)
- Large flat work surface
Sizing Your Blanket
The first step is to decide what the finished size will be. Here are some options based on standard U.S. bed sizes. But, you can make your tie blanket any size you wish. These sizes exclude the tied fringe, and are the solid fabric part only.
- Lap-size: approximately 36″ x 42″
- Crib or Child-size: 28″ x 52″
- Twin Bed: 38″ x 75″
- Full-size Bed: 54″ x 80″
- Queen-size Bed: 60″ x 80″
- King-size Bed: 76″ x 80″
In order to give you enough allowance for your ties, simply add 5″ on each side of the finished number. As an example, for a lap-size blanket 36″ + 5″ for the top + 5″ for the bottom equals 46″. For the long sides, it would be 42″ + 5″ for the left side + 5″ for the right side equals 52″.
Here are the fabric amounts you’ll need for the above sizes with a 5″ tie:
- Lap-size: 46″ x 52″
- Crib or Child-size: 38″ x 62″
- Twin Bed: 48″ x 85″
- Full-size Bed: 64″ x 90″
- Queen-size Bed: 70″ x 90″
- King-size Bed: 86″ x 90″
Buying The Fabric
This is where it gets really fun. Head to your local fabric store and go directly to the fleece section. You’ll see a myriad of choices, not only in patterns and colors, but weights as well. What’s important, since you’re not finishing (sewing) the edges, is to get “Blizzard”, anti-pill, or micro-fleece. If you’re not sure what’s what, simply ask the team at your fabric store. Tell them you’re making a tie blanket and they’ll point you in the right direction.
I like to use two different fleeces – a print and a solid to match. I’m matchy-matchy that way! But, you certainly could use two solids or two patterns. Just remember, you’ll need TWO pieces of the same size to make one blanket, a front and a back.
A Word on Fabric Cuts
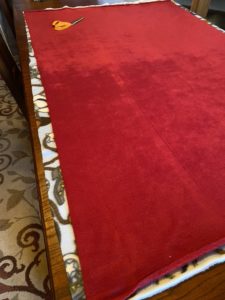
You can see here how crooked the two pieces are because of how they were cut!
When it comes to cutting fabric, knowing what your fabric will do is important. Fleece is inherently stretchy, much like a knit. That means if you don’t line your fabric up then pin it in place, or if you pull the fabric as you’re cutting, you’re likely to have crooked cuts. And, if it’s not cut well when you buy it, you may struggle with aligning your fabric once you get it home.
When buying your fabric, make sure the cutter at the store lines your raw edges up straight so your piece will be straight. I also recommend that if they’re not lining your edge up straight to the measure guide on the table, and/or they’re not using the cutting guide on the cutting table (the groove in the cutting table that they should be putting their scissors into to guide a straight cut), kindly suggest they use the cutting guide.
Getting Started
I generally don’t wash the fleece before I start my blanket, but you certainly can. It doesn’t shrink, so I’m not too worried about it coming out of the washer and dryer wonky. By the way…these blankets will wash and dry up nicely with no special care!
You’ll need a large, flat, solid surface to lay your fabric out. Make sure it’s a surface you can easily cut on like a table – don’t do it on carpet or a rug! I typically lay it out on my dining room table, which also helps with sliding the fabric around as needed.
Lay out one piece of fabric with the good side FACE DOWN on the table. Lay the second piece of fabric on top of the first with the good side FACE UP. You want your wrong sides together. It’s sometimes hard to tell the “wrong” sides on fleece. Take a close look and rub your hand on the fabric. The wrong side is sometimes not as soft as the right side, and you can feel the difference. Be sure to line up the edges as best you can.
If the fabric is a bit crooked once you’ve laid both pieces out, simply trim the edges to straighten it up. I also trim off the curled salvage edge that’s typical on fleece. The salvage edge is the edge that was NOT cut at the store, and looks almost like a finished edge. In fact, on print fabrics it’ll look like there are printed words on it. Those are color registry words. If you look at the photo above, you can see the curled edges in bottom right corner of the photo. That’s the curled, salvage edge of my fabrics.
Make sure there are no wrinkles in the fabric, that it’s laid out smoothly. But, be careful not to stretch it! Then, using straight sewing pins, pin the fabrics together every 6″-8″ all the way around so that the fabrics don’t slide as you’re cutting.
Making the Cuts
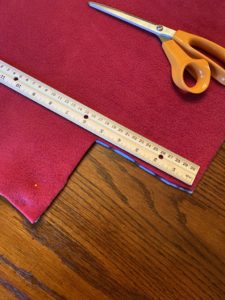
Cut each corner.
Use a ruler or yardstick as a guide. Your first cuts are going to be a 5″ x 5″ square out of each corner. This will help you make a good turn at the corners and not make your blanket pucker. Then, set your ruler 5″ from the raw edge of the fabric. This will show you how deep to make your cuts and keep them even.
Next question is how wide or thin you want your ties. The wider the cut, the less ties on the blanket (and sometimes the harder they are to tie!). I generally cut my ties 1.5″ wide. Make 1.5″ cuts, 5″ deep, all the way around so that you have a “fringe” all the way around the blanket.
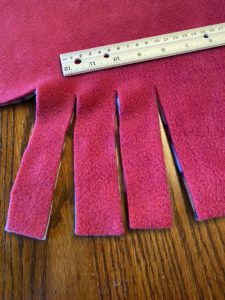
Cut the fringe all the way around.
Tying The Fringe
There are two ways to tie your fringe knots. The easiest to do is to simply double-tie the two fringe pieces together to make a knot. This is easiest for children or those who struggle with more complicated knots, including people with bigger fingers, and is more random and the fastest to do. Note that if you tie the knots exactly the same (i.e. all bottom over top fringe OR top over bottom fringe), your solids will all be on one side and your patterns on the other. Give it a try and see what you like!
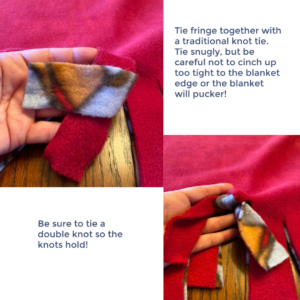
The second can be a bit more challenging, but it will make your fringe lay flat. Poking the end of the fringe into the loop made can be challenging with the bulk of the fleece. If you’re going to do this style of knot, it’s important you have a good 5″ fringe cut so you have enough fabric to work with.

In order to keep the blanket flat and not puckered, I tie all of one side then tie all of the opposite side. Then I move to each end. While you certainly can simply work your way around in a circle, I find if I’m not careful with the tension of my ties my fabric will get off-kilter and the blanket puckers.
Now, settle in and get to tying, and in no time….VOILA’ you have a tie blanket!
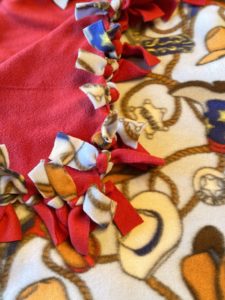
This was “easy” tied, and you can see how fun the edge is!
Now, pour yourself some nice hot chocolate, find a great book and cuddle up in the warmth of your new tie blanket. Drop your comments below, or head on over to Untamed Parody on Facebook and drop me a photo comment! I’d love to see your finished work…
